Tuesday, September 11, 2012

Teaching Place Value in First Quarter?!?

As you know, our state has adopted the Common Core Standards for Language Arts and Math and we are in implementation year #1. According to these new standards, Place Value is first introduced in the first quarter of the school year. In the past we introduced Place Value during the third quarter, when the students had a much better understanding of numbers. When my team and I saw this BIG change we were a little worried about it! It has been an eye opening experience, but I must say my students are really getting the hang of it the more we practice!

With all that said, I wanted to share some old and new ideas for Place Value. (Please forgive me if I don't remember the exact source of where I got the ideas.)

 
Place Value Mats

When we introduced Place Value in the third quarter of the school year, it was during the Winter season and we made these super cute Penguin mats....
 
I believe this idea came from The Mailbox. My penguin was larger so that I could use it easily during a whole group lesson. Aren't they cute?!
 
These are the numbers that one of my teammates created for us to use on the mats (0-9). We simply ran them on construction paper (color of our choice) and if time aloud, the students got to decorate their numbers. We stored them in sandwich size plastic bags.


We also used Base Ten blocks (tens and ones) to represent numbers on our mats!


Now that we introduce Place Value at the beginning of the school year, my team and I didn't think penguins were really appropriate. However, the mats really helped our students learn and understand the concept of tens and ones. So, we threw out some ideas and this is what I came up with...
 
An owl! Isn't he handsome?!
Same concept, but an animal that they might see/hear this time of the year!! I was inspired by a craft I saw on Pinterest and I simply free-handed the wings, feet, eyes, head, and mouth and made masters of them to run on construction paper. I'm no artist, but I thought the owls turned out so cute (and no two turned out the same, they have such personality)!  
 
 
Count Your Beans
 
This activity can be found on my Math Pinterest board, but actually came from the Kindergarten Crayons blog. It was soooo helpful! I do believe that we played this game for two days instead of just one as originally scheduled in my lesson plans. (Exactly why I use pencil in my plan book!!) Like I said earlier, this was an EYE OPENING experience! Day one, the students were still a little lost. However, by the end of Day 2 most of their little light bulbs were glowing with understanding! I then made this activity one of my Math Stations this week and the students are absolutely flying through it with no problems and need no help with it at all!! Yay!! I'm so proud of my Buckaroos!
 
Thank you for this wonderful resource! I totally recommend using it in your classroom!
 
  Other Place Value Activities
 
On my Math Pinterest board you can find even more Place Value activities. There are just too many great ones to list them all! I hope you enjoy the ideas above and check out the others on my Math board.
 

Holly Kaczmarek

Monday, September 10, 2012

Mouth Watering Monday!

I'm sure that I have said this once or twice before, but I really don't know how bloggers find time to blog as much as they do and still have life happen around them! My goal was to post at least once a week once school started and even that is a struggle for me currently!

Every August, when it's time for me to report back to work, my evenings start filling up like I was missing in action all summer.  It gets a bit overwhelming at times, and leaves me with no extra time to do anything but fall asleep the second I stop moving!  So between Tuesday night Birth and Beginnings classes at the hospital, Wednesday night Bible study and Thursday night Breastfeeding classes this girl is spread really thin! Not to mention, I'm just exhausted after a full day of work! With all that said, I do really enjoy creating new blog posts and will continue to try and find time to post more often! (My classes will be done at the end of September, so hopefully I will find more time then.)

This week's recipe can be found on my Yummy Things Pinterest board, but it actually came from the blog Two Maids a Milking. If you love crescent rolls and tacos then you will love this recipe!


Doritos Casserole a.k.a. Taco Bake
 
Pinned Image
 
 
This is a quick and easy crowd pleaser! We like to pair it with a salad or some green veggies! I hope you enjoy it!

Holly Kaczmarek

Monday, August 27, 2012

Mouth-Watering Monday!

Today's recipe is a crock pot favorite at our house. It is one of those recipes where you dump everything into your crock pot in the morning and come home and enjoy your dinner in the evening! Great for a busy life! I don't know the actual name of this recipe, but I like to call it Chicken Tortilla Soup. I found it via Pinterest and from the moment I saw it I knew I HAD to try it! Now I'm in love!

Check it out for yourself...

 Pinned Image
 
My tips for this AMAZING soup...
 
I add in about half a carton of Chicken broth (about --- oz.) so that it's not so thick!
 
 
We like to garnish our soup with sour cream, shredded cheddar cheese and crushed tortilla chips. (It's a great way to get rid of the end of a bag of tortilla chips too!)
 
Just a side note, this recipe makes a lot so it's great for several people, or we like it because then we have lunch or dinner for several days!
 
I hope you enjoy it as much as we do!!!
 
 
BONUS NO BAKE RECIPE!!!
 
Well, kind of! This isn't so much a recipe, but rather a cute idea to use for your first day!
Today was my first day with my First Graders and I wanted to share with you the treat I gave them as they exited my classroom. I found this idea last summer at Stepping Into First Grade and could not wait to do it! It's quick and easy and becoming an annual tradition in my classroom!


 Maybe it will become a tradition in your classroom too!


Holly Kaczmarek

Saturday, August 25, 2012

Ready or Not Here They Come!!

 I think the title of this post says it all! The first day of school is Monday and whatever is left undone at this point will have to wait until after my Buckaroos walk out the door to go home! That is, anything in the actual classroom because I am currently finishing up some computer work this weekend. I think most teachers would agree with the statement below, and not just on the first day of school either! Let's face it, some of the best lessons happen because of this:

Pinned Image


      I have stated in a previous post (or two) that one of my goals for the school year is to post at least once a week on my blog when the KRAZINESS of the school year begins! Well, it's here and I've quickly realized just how KRAZY my life gets once I head back into my classroom each year. Not only do I have a MILLION things to do in the classroom, but it seems like everyday after work there is something else scheduled. It's like this every year, but I seem to forget just how busy I really get!Please don't get me wrong, I'm not complaining. I just can't figure out how so many bloggers out there can post daily when life gets so busy! Maybe one day soon I will figure out their tips and tricks. (Which are welcomed!) I'm sure it doesn't help when you're a Virgo with a perfectionist attitude! LOL! I will not post something unless I think it's perfect. It's a blessing and a curse in all areas of my life, just ask my husband! That's enough of my babbling for today, let's move on to the real reason I brought you here. At the end of July, I posted some classroom pictures from previous years. Some things are the same, but as usual I have changed some things too!


Here's a peek into my classroom for the 2012-13 school year!!

Howdy Buckaroos! All the bandannas and horse shoes have the students names on them.

A peek into the classroom from my doorway.
New classroom displays... Hundreds Board Whole Class Incentive chart on the back of the door, classroom behavior chart (which I am so excited about!) and the "Back to School" bulletin board. The "Back to School" bulletin board will change approximately once a month to go along with our new Reading series called Imagine It! They call it a question/concept board and we build it with our students at the beginning of each unit (that's why it looks unfinished).

My new classroom behavior chart up close! Thank you to Cindy Cortez over at Teaming Up To Teach. She created this particular behavior chart and I found it via Pinterest. If you like it, and would like to use it too, click here!


The blue bookshelf is a home to an extra papers bin, a clear plastic bin where my students turn in completed assignments (there's a hanging folder for each subject area), orange Imagine It student materials, green Writing notebooks and blue Center folders. This bookshelf also helps hide the cords to my document camera and projector located on the other side of the shelf.


My new Word Wall! If you look closely you can see Miss Johnson's table with the fabric skirt around it and the Common Core posters hanging on the ribbon to the left of the Word Wall. Miss Johnson is my student teacher from Appalachian State University.


Here is the Word Wall again. Thanks for helping me put it up Miss Johnson!

Miss Johnson and I right before Open House!  I would like to say a HUGE Thank You to both Miss Johnson and Mrs. Estes, my wonderful assistant, for all their help! (Mrs. Estes is taking the picture for us!)

Writing Center


A different view of the Writing Center. The bookshelf houses dictionaries, highlighters, student offices, and baskets for sharpened and broken pencils. Cowboy Woody is sitting on the white shelves keeping an eye on our Class Cash!


Our  Creation Station... too bad it usually doesn't stay this neat and clean! Under the table we store classroom supplies like glue sticks, pencils, erasers, markers and crayons.
 
 
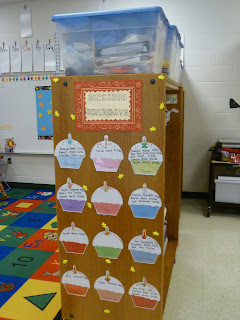
Buckaroo Birthdays! I found the cupcakes last year via Pinterest and they were created by Kathryn over at www.kindergartenkindergarten.com  and can be found here! I made the cute sign out of a place mat and a free font I found on the computer called "DRIFTTY PE". Isn't it cute?!
 
This is how we display student work in the hall. Yes, the glitter clothespins made their way into the hallway too! I just couldn't help myself!!
 
My area of the classroom!
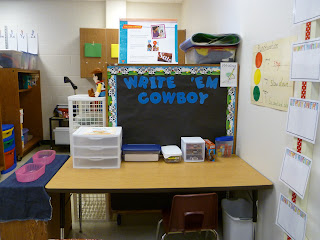
Remember, the table is my Guided Reading area and my desk too!

You can see my new table with the printer and my lesson plan book on top of it; under the table you can see plastic drawers for storage and my monthly storage bin. The book shelf houses some of my most frequently used teacher resource books for Language Arts and Math and my laptop is hooked up on a student desk so it does not have to sit on my Guided reading table.

My new table up close! The pink cowboy (or in this case, cowgirl) hat that you see hanging on the wall is what I wear so that students know when they can't bother me. I usually wear it while doing Running Records or other assessments and during most Guided Reading groups.

Filing cabinet and Monday through Friday lesson plan drawers. I house everything I need for my lessons in these clear drawers each week. If you look closely, all the cards from Imagine It have been turned backwards until they are introduced.

 
Thanks for stopping by my classroom, I hope you really enjoyed it!
 
 
I also joined a linky party about Classroom Photos over at Teaching Blog Addict! If you are curious about other classrooms, click on the picture below.


Holly Kaczmarek

Monday, August 13, 2012

Mouth-Watering Monday!

Now I know that I have a sweet tooth, but this little baby girl growing inside of me has made it even bigger! With that said, today's recipe is a wonderful dessert for you to try. It's called Honey Bun Cake and both smells AMAZING while baking and tastes AMAZING too! It starts with a box of yellow cake mix ( I used Betty Crocker Butter Yellow) and the rest of ingredients are things that you would normally have on hand (eggs, oil, sour cream, cinnamon, brown sugar, powdered sugar, vanilla and milk). Hey, I never said it was healthy, just that it tastes AMAZING!!


This recipe came from The Country Cook and she has many more marvelous recipes for you to check out! Her recipe is to make this cake in a 9x13 pan, but I chose to make cupcakes because I am delivering some to a friend for her birthday and taking the rest to a meeting with my First Grade team tomorrow.

Here are some tips for the Honey Bun Cupcakes (some tips are for cupcakes in general)...

Tip #1:

Pinned Image

I like to pour my cupcake batter into a gallon size plastic bag and snip the end off. Using this tip, I can squeeze the batter into each liner without making a huge mess. The tip shown above was found via Pinterest, and came from the website http://bakingdom.com. I have a cool kitchen gadget that I received from my mother-in-law last Christmas that I use in place of a glass. Same concept, but can be used when marinating meat too! Here are a few pictures of my gadget:

My little plastic bag stand.
It's adjustable for different size bags too!

It also folds flat for easy storage! Isn't it fun! I love it!
                  

 Tip #2

Pinned Image


 Tip #3

For the Honey Bun Cupcakes I covered the bottom of each cupcake liner with batter. Then, I sprinkled about a teaspoon of cinnamon mixture in each (you could add more if you like, I had a lot left over). Finally, I covered the cinnamon mixture with more batter (I did not worry about swirling the cinnamon mixture into the batter) and popped them into the oven for 25 minutes. I followed the tip pictured above for the baking.

Tip #4

Using the same plastic bag trick from above, I drizzled the glaze over top of each cupcake.   

 This recipe was very easy and gave me about 2 dozen cupcakes.

I hope you like it!


Holly Kaczmarek

Sunday, August 12, 2012

Extremely New Blogger That You NEED to check out!

Kristen is one of my friends who was just recently inspired to start her first teaching blog. She is super excited about starting this school year because she will be teaching in a new school and a new grade! Both were a much needed change for her. Kristen is so new to the blogging world that she just featured her first post today! How exciting! Even though she is just starting out, she is a blogger you will DEFINITELY want to keep up with. She has lots of great ideas to share, and she started sharing them today!! Go check it out for yourself...


Holly Kaczmarek

Friday, August 10, 2012

Clothespins and New Classroom Decor!

I have been working in my classroom this week trying to get it ready before we HAVE to report on August 20th and the KRAZINESS begins! Last Spring (right before Spring Break), our school was painted so we had to take everything off of the walls. I was not about to redecorate my classroom with only a few weeks left in the school year and boy am I glad I made that decision! Staring at the boring white walls paid off in the end.

After both the students and teachers finished the school year, we had some training for our district's new Reading adoption called Imagine It! At the training we found out that the program came with about 45 sizable Alphabet/Phonics cards (the company refers to them as Sound/Spelling Cards) to hang up around the room. Not only did we have to find homes for 26 Alphabet cards, 5 Long Vowel cards, 8 Vowel Digraph cards and 6 Consonant Digraph/Blend cards but the cards have to be able to be flipped as they are introduced. Plus, we were also told that we would have more High Frequency Words to put on our Word Walls this year AND we needed to have a "Question/Concept" bulletin board that changes about once a month! Whew!

Since the training, I have been trying to figure out where in the world all of this stuff was going to go in my classroom and how to hang it so it can be flipped. The good news, I had a "blank slate" due to having nothing on the walls! It was mentioned at the training that we could use clothespins to hang the letters. I was sold...Cheap and easy! My friend and colleague Anna mentioned she had painted hers to make them more appealing. I was planning on doing NOTHING to the clothespins except hanging them on my walls. Needless to say, Anna inspired me! I didn't really want to paint clothespins so I got on Pinterest to see if there was a different way. What I quickly found out is that there are MANY ways to decorate clothespins...Who knew? Here's the way that I chose to do it:

Pinned Image
This picture is the one I found via Pinterest, but the idea actually came from a blog called Clean Mama. 

I would like to say a HUGE thank you to Clean Mama for the awesome tip! It worked great!

Here are the materials that I used for my clothespins:


I found this border at Michael's in the scrap booking isle.

Here's how my clothespins turned out:


Here are a few pictures of my new and improved classroom decor:
My Alphabet Sound/Spelling cards from far away.

 The letter cards are blank and boring right now, but as we introduce them we flip them and they have pictures and spellings on the back. The Long vowel cards are hanging above the Alphabet line and should be blank right now, but I wanted to see what they looked like.


Vowel Digraph Cards
These will also be blank until we introduce and flip them over. I chose to put them near my Guided Reading area, but the Buckaroos can reference them from anywhere in the classroom!
Here are two cards up close so you can really see the clothespins!


Consonant Digraph/Blend Cards
 Up close...

and far away. They are also near my Guided Reading area, but can be seen from anywhere in the classroom!
(Please ignore the messy bookcase, I took my pictures and then cleaned it off.)

Question/Concept Board
I am utilizing this space on my wall as my Question/Concept bulletin board. It's a blank slate right now, but that will change in a few weeks.


I am slightly obsessed with my clothespins! (Aren't they cute?!) Plus, I am so glad that all my new decor has a home! Let me know what you think about everything going on in my classroom so far, and stop back soon for more updates!

Holly Kaczmarek

Thursday, August 9, 2012

Some New Classroom Organization!

I think I am a pretty organized person and teacher, but every year I try and learn from the previous one and get myself even a little more organized. It usually starts with a piece a furniture and a few KRAZY ideas that I've found along the way! This year is no different.

Towards the end of the year last year, I noticed that the bookshelf that housed my printer/copier/scanner was starting to fall apart. Boo! I thought I might still be able to make it work, but after checking it out a few weeks back, it will no longer support my printer/copier/scanner. Of course, I could have just went out and bought the same bookcase at Walmart or Target, but that's not what I wanted to do. I had yet another KRAZY idea...

I remembered that one of my former colleagues had a small, narrow table behind her desk that helped keep her organized and her desk clutter free. I also remember telling her how much I liked it. I decided that's what I was going to go out hunting for because I could put my printer/copier/scanner on it, but I could also put my lesson plan binder on it which would keep it off of my Guided Reading table! If you remember I do not have a desk (my choice) and my Guided Reading table (which also serves as my desk) would fill up quickly each day. My lesson plan book always sat there too, just getting in my way or getting buried! I decided that having a table like hers would solve many of my problems.

I started by taking measurements in my classroom to ensure that what I bought would actually fit the small, narrow space. Here is what I found:

Room Essentials  Parsons Desk - Black  
$35 at Target! Perfect!

I also planned on displaying my lesson plan binder on a cookbook stand based on another idea found on Pinterest. However, I only liked the way it looked (and the space it took up) when it was closed. (This is a great idea, but it just didn't work for me personally. Maybe you will like it!)

Pinned Image
(This idea came from Mrs. Terhune's First Grade Site. She has an awesome site and you should really go see her fabulous ideas!)

I decided that I would just lay my lesson plan binder down on my new table, and use this other organizational tip (which I found last summer via Pinterest and have been thinking about ever since) behind it instead. I think it's more me, check it out...

Pinned Image

I would like to say thank you to Miss Kindergarten for sharing this great organizational tip! I will have to let you all know how it works out for me this year.

In case you are wondering, I bought a "Locker Crate" at Walmart today for $5 or $6 that I plan on using to create this lovely organizational tool for my classroom. (There were some cute colors!) Miss Kindergarten attached her plans to the front via the rings, but I don't think that will work out for me. Instead, I plan on attaching my calendar to the front. I will post pictures of my newly organized area when it's ready!

Update!!

Here's a glimpse of my new table...

I'm one happy lady!


Holly Kaczmarek